> For the complete documentation index, see [llms.txt](https://docs.panther.com/llms.txt). Markdown versions of documentation pages are available by appending `.md` to page URLs; this page is available as [Markdown](https://docs.panther.com/ko/data-onboarding/data-pipeline-tools/cribl.md).
# Cribl 온보딩 가이드
AWS S3, Cribl 및 Panther를 사용하여 민감한 로그 데이터를 마스킹하는 방법
## 개요
이 가이드에 설명된 프로세스는 Cribl Cloud 또는 Cribl Self-Hosted를 사용하여 민감한 로그 데이터를 마스킹하는 방법을 설명하며, 특히 Amazon Web Services(AWS) S3 버킷과 Panther 내에서 작업합니다. 전반적으로 다음을 수행합니다:
* Cribl에서 S3 버킷을 인증하며, 수동 방식과 Event Breakers의 예시를 포함합니다.
* JSON 데이터 형식을 사용하여 AWS S3 소스와 대상을 구성합니다.
* 사전 및 사후 Cribl 마스크를 사용한 JSON 이벤트 예시를 제공합니다.
## Cribl로 민감한 필드를 마스킹하는 방법
### 1단계: Cribl에서 AWS S3 소스 구성
1. Cribl에 로그인합니다. 왼쪽 메뉴에서 **Groups**로 이동한 다음 페이지 상단에서 **Routing** 드롭다운을 클릭하고 **Quick Connect를 선택합니다.**\

2. 다음을 클릭합니다 **Add Source**를 클릭한 다음 소스 목록에서 Amazon S3를 선택합니다.\

3. 아래에서 **Configure > General Settings**에서 고유한 Input ID, SQS Queue의 ARN을 입력하고 필요에 따라 추가 필터를 지정합니다.\

4. 다음을 클릭합니다 **Authentication** 왼쪽에서 클릭하여 다음 인증 방법 중 하나를 선택합니다:
* **Manual** - Access Key와 Secret Key가 필요합니다(AWS에서 Access Key와 Secret Key를 생성해야 합니다)
* **시크릿** - Secret key pair(AWS에서 이 키 쌍을 생성해야 합니다)
* **자동** - AWS Account ID와 Assume Role 섹션에서 구성할 ARN이 필요합니다. 이 역할은 S3 및/또는 SQS에 대한 접근 권한이 있어야 합니다.\
\
위의 예시 화면에서는 "Manual"이 선택되어 있습니다.
5. 다음을 클릭합니다 **Event Breakers** 왼쪽에서 Cribl 이벤트 브레이커를 선택합니다.
* 참고: 이 단계는 Cribl이 들어오는 JSON 데이터를 파싱할 수 있게 합니다.
### 2단계: Cribl에서 AWS S3 대상 구성
1. QuickConnect 페이지로 다시 이동합니다. **대상 추가** 를 클릭하고 Amazon S3를 선택합니다.\

2. General Settings 페이지에서 다음을 입력합니다:
* **S3 버킷 이름.** AWS에서 이러한 S3 버킷은 동일할 수 있습니다. 필요한 경우 버킷 내 객체는 prefix 필터로 구분할 수 있습니다.
* **버킷 리전**
* **접두사** 출력되는 JSON 파일용
* **파일 이름 접두사 표현식**\
\\
3. 다음을 클릭합니다 **Authentication** 왼쪽에서 클릭하여 다음 인증 방법 중 하나를 선택합니다:
* **Manual** - Access Key와 Secret Key가 필요합니다(AWS에서 Access Key와 Secret Key를 생성해야 합니다)
* **시크릿** - Secret key pair(AWS에서 이 키 쌍을 생성해야 합니다)
* **자동** - AWS Account ID와 Assume Role 섹션에서 구성할 ARN이 필요합니다. 이 역할은 S3 및/또는 SQS에 대한 접근 권한이 있어야 합니다.\
\
위의 예시 화면에서는 "Manual"이 선택되어 있습니다.
### 3단계: Cribl에서 파이프라인 구성
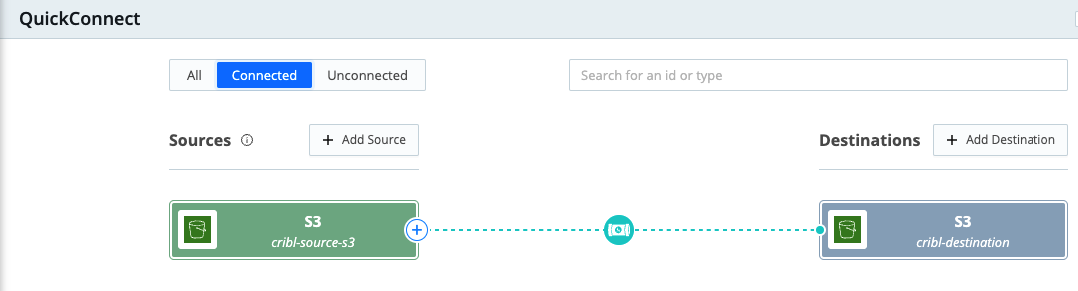
1. 소스와 대상을 연결하는 점선 을 클릭합니다:\

* Connection Configuration 대시보드로 리디렉션됩니다.
2. Connection Configuration 대시보드의 오른쪽 상단에서 **+ Pipeline.** 를 클릭합니다. 나타나는 드롭다운 메뉴에서 **Create Pipeline**.\

3. 나타나는 "Create New Pipeline" 팝업 대화상자에서 이름 `redacted` 를 **ID** 필드에 입력합니다. 필요에 따라 Async Function Timeout과 Description을 입력한 다음 **저장**.\

4. Processing / Pipelines 페이지에서 파란색 기어 아이콘을 클릭합니다.\

5. 오른쪽 상단 모서리에서 다음을 클릭하세요 **Edit as JSON**.\

6. 아래의 JSON 블록을 붙여넣습니다. 아래 JSON 블록에는 두 개의 필터가 있습니다:
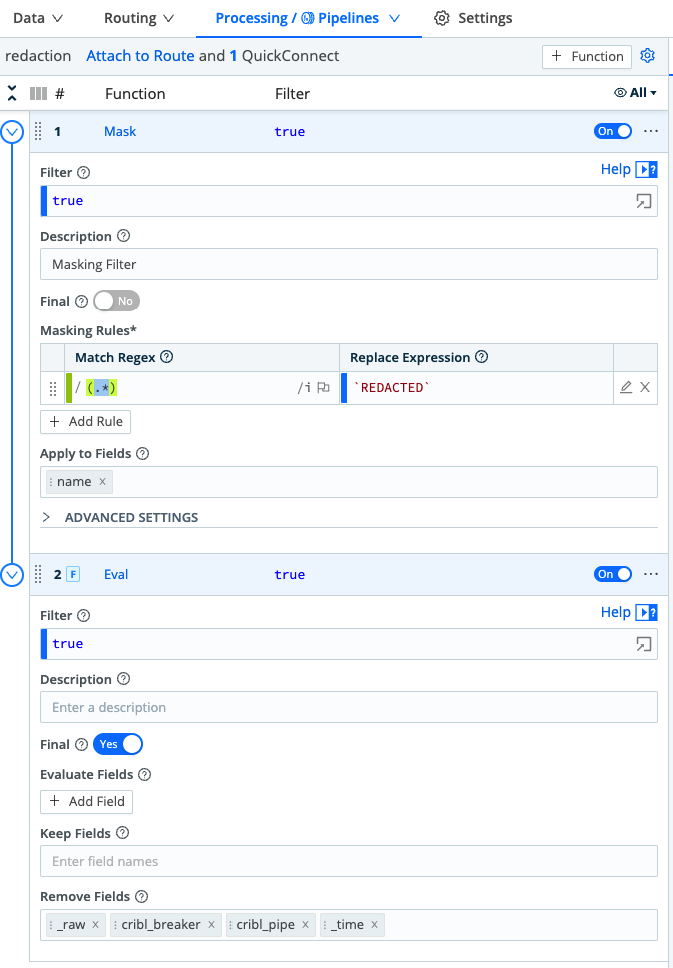
* **Mask:** 의 모든 내용을 `이름` 필드에서 `REDACTED`
* **로 대체합니다.** 다음 필드를 제거합니다 `_raw` `cribl_breaker` `crible_pipe` `_time`\\
```
{
"id": "redaction",
"conf": {
"asyncFuncTimeout": 1000,
"functions": [
{
"filter": "true",
"conf": {
"rules": [
{
"matchRegex": "/(.*)/i",
"replaceExpr": "`REDACTED`"
}
],
"fields": [
"name"
],
"depth": 5,
"flags": []
},
"id": "mask",
"description": "Masking Filter",
"final": false
},
{
"filter": "true",
"conf": {
"remove": [
"_raw",
"cribl_breaker",
"cribl_pipe",
"_time"
]
},
"id": "eval",
"final": true
}
],
"description": "redaction-pipeline",
"groups": {}
}
}
```
7. JSON을 저장합니다.
JSON이 저장되면 UI에 아래 스크린샷과 유사하게 마스킹 규칙이 반영됩니다:
완성된 Data Route는 아래 스크린샷과 유사하게 표시됩니다:
## JSON 예시: Cribl 전후
다음 예시는 이 가이드의 이전 단계에서 언급한 `mask` 필터를 사용한 JSON 이벤트를 보여줍니다. mask 필터를 사용한 후 name 필드 `Bella` 는 `REDACTED.`
**Cribl 이전 마스크:**
```json
{ ... "name": "Bella", ...}
```
**Cribl 이후 마스크:**
```json
{ ... "name":"REDACTED", ...}
```
구성 후 마스크 필터가 예상대로 작동하는지 반드시 확인하시기 바랍니다. 마스크 필터가 올바르게 작동하는 것이 확인되면, 마스킹된 로그를 Panther로 수집하세요 [S3 Data Transport를 사용하여](/ko/data-onboarding/data-transports/aws/s3.md).
---
# Agent Instructions
This documentation is published with GitBook. GitBook is the documentation platform designed so that both humans and AI agents can read, navigate, and reason over technical content effectively. Learn more at gitbook.com.
## Querying This Documentation
If you need additional information that is not directly available in this page, you can query the documentation dynamically by asking a question.
Perform an HTTP GET request on the current page URL with the `ask` query parameter, and the optional `goal` query parameter:
```
GET https://docs.panther.com/ko/data-onboarding/data-pipeline-tools/cribl.md?ask=&goal=
```
`ask` is the immediate question: it should be specific, self-contained, and written in natural language.
`goal` is optional and describes the broader end goal you are ultimately trying to accomplish on behalf of the user. GitBook uses it to tailor the answer towards what is most useful for that goal.
The response will contain a direct answer to the question and relevant excerpts and sources from the documentation.
Use this mechanism when the answer is not explicitly present in the current page, you need clarification or additional context, or you want to retrieve related documentation sections.